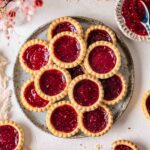
Vegan Jam Tarts
Vegan jam tarts with a buttery shortcrust pastry filled with an easy homemade (or store-bought) raspberry jam. You only need a few common ingredients to make these classic tarts!
Servings: 20 tarts
Ingredients
Quick Raspberry Jam (alternatively, use 300g of store-bought jam)
- ~1 cup (150g) fresh or frozen raspberries, chopped strawberries or fruit of choice
- ½ cup (100g) granulated sugar, powdered sugar or sweetener, to taste
- ¼ cup (60g) water, or as needed
- 2 tablespoons (14g) cornstarch / corn flour, (note 1 for chia seed replacement)
Shortcrust pastry (note 2 for oil-based pastry)
- 1 ¾ cups (220g) all-purpose plain flour, plus extra for dusting
- 125 g vegan block butter, room temperature (note 3)
- ⅓ cup (35g) powdered sugar / icing sugar
- 3 tablespoons (45g) water, plus more if needed
Instructions
Make the raspberry jam (skip if using store-bought):
- Add all the ingredients to a small saucepan and mix until just combined. Make sure there aren't any lumps of corn starch.
- Place the saucepan over medium heat. Mash the berries with the back of a fork or a stick blender. Stir the mixture for 5-10 minutes or until it has thickened and has a consistency similar to store-bought jam. If the mixture is too thick, add a dash of water to thin out. If the mixture is too runny, cook the jam for a little longer.
- Set aside the jam to cool. The jam will thicken as it cools.
Make the shortcrust pastry:
- Add all ingredients to a large mixing bowl or food processor. Mix until the dough starts to clump together. The dough should be quite soft but pliable and can be pinched between two fingers without breaking. If the dough is too dry, add 1 tablespoon of water and mix again. If the dough is too wet, add 1 tablespoon of flour and mix again.
- Gently knead the dough into a smooth ball (note 4).
Assemble and bake the vegan jam tarts:
- Preheat the oven to 180°C (350°F). Grease around 20 mini shallow tart tins.
- On a clean floured surface, use a rolling pin to flatten the dough to around 5 mm (¼ inch) thick.
- Use a 6 cm (2 ½ inches) fluted cookie cutter to cut circles out of your pastry. Gently press the pastry circles into your tart moulds. Re-roll the remaining pastry and repeat until all of the dough has been used up.
- Use your fingertips to press the pastry against the bottom and sides of each tart mold. (note 5)
- Dollop around 1 tablespoon of jam in the middle of each tart. If needed, smooth out the jam in each tart.
- Bake the vegan jam tarts for around 20 minutes or until the tarts are slightly golden brown. Allow the tarts to completely cool in the moulds.
- Remove the tarts from their molds and enjoy! Store them in an airtight container at room temperature for 2 days, in the fridge for 1 week or in the freezer for up to 1 month
Notes
- For a chia seed raspberry jam, omit the water and replace the corn starch with 2 teaspoons of white chia seeds.
- Alternatively, you can use softened room temperature coconut oil (in the same amount as the butter). I'd recommend adding a generous pinch of salt to mimic the buttery flavor. If you'd like to use liquid oil, use 2 ½ cups (310g) all-purpose plain flour, ½ cup (125g) liquid oil, ⅓ cup (35g) powdered sugar. The oil-based pastry is more delicate than the butter version so should be pressed directly into the tart pan.
- Spreadable vegan margarine will also work for this pastry. However, I'd recommend adding no water and, if needed, adding 1-2 tablespoons of extra flour to ensure the pastry is a workable consistency.
- At this stage, you can use the pastry as is or chill it in the fridge until needed. I'd recommend wrapping the pastry in a food wrap or storing it in an airtight container.
- If this step is too fiddly for you, you can divide the pastry into 24 even parts and press them into your cupcake/tart mold.
Nutrition
Serving: 1 tart | Calories: 120kcal | Carbohydrates: 17g | Protein: 1g | Fat: 5g | Sodium: 42mg | Potassium: 24mg | Fiber: 1g | Sugar: 7g | Vitamin A: 2IU | Vitamin C: 2mg | Calcium: 4mg | Iron: 1mg
Did you Make this Recipe?Rate it & leave your feedback in the comments section below, or tag @rainbownourishments on Instagram and hashtag #rainbownourishments!